As promised, I finally managed to do the tutorial for quilled butterfly. Am so happy that my camera's back so now I can take lots and lots of pictures again! Yeay!
Okay here goes the how to session.
All you need would be scissors, glue, circle template (you can get this at any stationery shop), quilling tool (or toothpick) and strips of papers (including the triangle). If you're too lazy to find shredding machine or measure the lines (like me) -my advice: do it free-handedly hahahha.. it doesn't matter if you didn't get straight lines, as long as it looks nice, it's fine with me :P By the way, you won't need that many strips of papers. Just 8-9 strips will do.
Firstly, roll the triangle like you're doing a paper bead necklace (used to do this in art class in primary school) from the wide end to the smaller end. Glue it so it would look like this:
Then select you paper (for the butterfly wings). I've decided to used shades of orange and yellow. You would need 2 shades for the upper wings, and 2 shades for the lower wing. So, mathematically (though I'm not good at it):
2 different strips = attached together to become 1 multi-coloured strip.
so for the upper wings = 2 multi-coloured strips
and the lower wings = 2 multi-coloured strips
On size and lengths, basically I just make do with what I have. The slimmer triangle would mean slimmer butterfly body. As for the strips, I use A4 paper so that's the length for each coloured strip (so 1 multi-coloured strip = A4x2). You may want to use longer strips, as the result would be much better. I'm just... lazy.
God I'm really bad with maths.
Next, roll the strips using the quilling tool. Make sure you start rolling from the colour that you want to be the inside colour of the butterfly wings. In this case, the yellow is the inside colour and the orange is the outside colour.
... Until you reached peds like this:
Don't glue them yet! Instead, let them roll inside the circle template to get the intended size for the wings. In my case, I use a size 20 and 17 for my wings. It depends on how big you want your butterfly to be. (Mind the battered-looking template hehe)
Leave them for a while, then glue the end of the strips. Be careful and mantained the sizes.
Repeat the steps until you have 4 rolled strips like this. Then you have to turn all four into the intended shape.
The shapes would be different depending on how you pinch the paper. This is a simple way of how to do the shape. Pinch the orange part first before pinching the yellow.
Then squeezzzee hard like this:
You can try different ways of pinching the quilled papers and have different results. But for the time being, here's what the quilled papers look like:
Once you have these, then you can start gluing them onto the butterfly body. Glue the smaller part first, like this:
Be careful as you would need glue that can easily dry and don't pull the butterfly before it's really dry. Once it's dry, then glue the upper parts. It's the same quilled paper, but I've adjusted the size so it could look rounder and fuller.
Attach the other part as well. Attaching the parts can be very tricky as the parts are really prone to detach themselves. So use whatever means necessary to stick them together. I usually use the quilling tool to help.
Once you're done attaching both parts, roll the two sesunguts to be attached to the butterfly.
And this will be your end result:
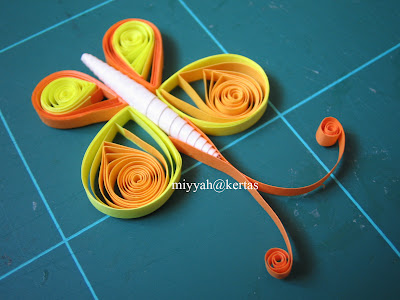
And you may want to make few friends for the butterfly... (I already have extras from the swap)
(oh! Yet to post the butterflies to our little miss Diva!)
Tuesday, September 23, 2008
How To : Quilled Butterfly
Labels:
Paper Butterflies,
Quilling,
Tutorials
Friday, September 19, 2008
New Craft Project
I've been so busy lately that I missed few challenges for Lovescrap Queen Challenge. Thank you Ida, for putting the challenges on hold until after raya. By that time, InsyaAllah I'll be better in time management and will be able to continue with the challenges.
However, for the time being it's really hard to find time to do craft works. I still have Calendar Swap to complete (already had the design so it's going to be a last-minute work heeh).
Hints: It's 2 in 1. It's sweet. It's yummy. And hopefully adorable.
On an update, I'm starting on a new craft project for school (by school I mean my gradschool). We have a group presentation after Raya break and we're going on a full-scale blast! hehe. I can't tell what it is yet (Shhh...), but will tell all about it once I'm done with it.
Oh. I got my camera back so InsyaAllah will post a How To for the paper butterflies later. Cheers! :)
Saturday, September 06, 2008
Paper Butterflies
Sorry for the long silence. I've started my new temporary work at the uni so life's been quite busy lately. Really hope to be able to catch up with you guys soon. Thank you for leaving comments on Project Runway hehe. (Well, I guess nobody watches PR Australia in Malaysia except for me - yeah, I'm a freak! Btw Lui had been ousted from PR Australia - the last elimination before the finals)
Since there are so many things pending now (Work, assignments, presentations, swaps, challenges, orders etc), I've had to start somewhere. Since today's replacement class is postponed to another date, I used the whole day to start on the paper butterfly swap. I have to start early, as other things are really piling up! I managed to do 9 paper butterflies, and plan to continue with the rest somewhere next week. Still need to coat the butterflies with nail polish, but that would have to wait till next week.
This is for Lovescrap/SKAC Paper Butterfly Swap which is due sometime after raya. Hoho! I have thousands of assignments to submit after raya so that's why I have to start making them now. Well, I chose to do quilled butterflies (ok, planned to do husked butterflies but don't think I have the time to set up the tools), since I already have everything I need at home.
So here goes the 9 butterflies (ignore the messy cutting mat hehe):
Close up:
Will post later on the last bookmark swap. :)
Labels:
Paper Butterflies,
Swaps
Subscribe to:
Posts (Atom)