Showing posts with label Tutorials. Show all posts

Friday, December 21, 2012

Classic Wedding (Part 2: Hand Bouquet)

The best part of preparing for our brother's wedding was that I was allowed to experiment with things I've always wanted to do, but didn't really have time to do them. Hee. This time around, I was going crazy over hand-painted papers, so I thought I could give it a try with this wedding.


Remember my first paper bouquet? It was such a mess and took a lot of my time that I almost gave up on doing another. However, with the current trend of handmade bouquet going rounds, I ought to give it a try again, right?


The tutorial for the ranunculus flower can be found here (amazing tutorial with detailed explanation). I made the hydrangea using a tutorial from a Chinese book (which I didn't understand, and relied totally on the pictures). Instead of using the ready-made coloured papers, I prolonged my suffering by hand-cutting and hand-painting my own paper to get the desired colours. Messy techniques.


It took me almost a week to frantically finish everything, but I think I'm quite satisfied with the end result. Yes, it could be improved in terms of durability and colour choice, but for a last-minute work, not bad, right? :P


I'm not sure whether I'd be able to do the bouquet again, since the process was so taxing, and I almost got insomnia from all these.. but again, you'll never know. ;-)

Monday, July 16, 2012

Flowers in your book


I know it's easier to use punches or dies to cut the flower petals, but I guess I'm the traditionalist who cut everything using scissors. A messy  work, but I like it even more hehe.

Funny how I hardly use bookmarks (and thus, always scramble my way looking for the  right pages haha). I know  some people who love using them, so these girlish flowers are for them. :)


The bookmark tutorial was also featured in Remaja 15th June 2012 edition. :-)


Saturday, July 07, 2012

Tips: Quilling Typography


Typography quilling using old magazine

I've received so many requests for typography tutorial. I couldn’t find time to do the exact tutorial, but I hope this entry will help a lot.

You can do your typography using one of these tutorials:

Craftastical Monograpm Quilling

Mezcraft for Instructables

Pritesh’s Quilled Lettering Tutorial

Typography on old mag using simple quilling designs


 However, there are also few crucial points I would like to add in keeping your typography neat and tidy:
  • I like to use PVA white glue for all my typography works. It dries faster and hold your paper pretty nicely. A quick tip: I usually put a dash of pva glue on a paper plate and leave it for a while. By the time I started quilling, the glue would be sticky enough to hold the quilling shapes and dries faster. It would also be easier for you to clean if you mess up.
  •  If you’re just starting typography, use thicker paper for the typography outline.
  • The bigger the letters, the easier it is to quill. So start with big-sized letters. Once you’re familiar with it, you can give smaller-sized letters a try.
  • Practice makes perfect. With lots of practices, and researches, I’m pretty sure that you’ll find your own favourite style :)
  • Typography quilling is one art that requires lots of patience, and sometimes it took me days, or even weeks to finish (and few papercuts here and there). Don’t easily give up. The above tutorials are THEIR ways of doing it, but you can always bend the ways, and create your own. :)
Give it a try, and  good luck!

Thursday, May 31, 2012

Featured in Remaja

Featured!

It might not be much, but it's a start. :)


For Malaysians, look out for the owls tutorial on Remaja, 1st of June 2012 issue, page 148.

Thursday, March 18, 2010

Tutorial: Another Paper Flower


It's been ages since I last updated my tutorial section. I'm feeling good this week (regardless the camera incident), so here goes another tutorial on how to make Another Paper Flower (never got tired of them!)

Materials needed:

Any types of paper (for the purpose of the tutorial, I'm using dark pink construction paper @ sugar paper)
Brads/ Craft wire
Paper flower punch/ Scallop scissors/ Any other craft scissors
(if you don't have any of those, a simple paper scissors will do)

Firstly, punch out 8 -10 paper flowers. If you don't have any flower punch, you can use scallop scissors or any other means, as long as you get enough flowers. I use paper punch because it's easier, and because I'm finally able to make use of the flower punch that I've bought ages ago hehe!

So here are the flowers:


Then arrange them together like this:


Poke two small holes in the middle of the flowers using sharp needle or pin.


Use brad or soft craft wire to tie all the flowers together. I'm using brads, but you can also use craft wires.


Once everything has been tied up nicely, here comes the fun part. Scrunch the first layer of the petals like this:


Then scrunch the 2nd layer of the petals. And continue scrunching the 3rd, and repeat the same step for all the layers of the petals. It will turn out like this:


Then, using your fingers, open up the scrunched papers slowly, to make it blossoms into a nice looking flower.


And repeat all the steps again if one flower is not enough (it never will!). And there you have it, your Another Paper Flowers, ready to be used as your craft embellishment.


The fun part of this flower-making is that you can use any types of papers and get flowers of different sizes and textures. This is what it looks like when I use my scallop scissors to make the flower. It's slightly bigger than the punched flowers, but I still love the effects.


I smudged the corners using red stamp pad to get the nice tone effects. And this one is done using baking paper cups:


Looks good to be decorated on boxes!

Try out your own Another Paper Flower using other types of shapes/ craft scissors and different types of papers - newspapers, mags, tissue paper, glossy paper, pattern paper etc.. and don't forget to try on combination colours on a flower (e.g dark pink and light pink would do wonders on a flower)

Just have fun experimenting ok! :)

Sunday, February 07, 2010

Quilling Basic


Aaah. How I remember thee. This card is truly a special one, as this marked my first try at quilling. This was done in 2006.


I cut the papers by myself (hence, the uneven edges), and rolled everything using fingers (hence, the not-so-whimsical design on the swirls). I didn't even know how to make flowers and yet I threw myself into the over-ambitious project, ha!


It turned out quite ok and I think I've improved a lot over the years. For example, here's a huge comparison on the butterflies that I made, and how they evolved in time:

The 2006 butterfly:

The 2008 butterfly:
 
The 2009 butterfly:
 

(yet to make butterflies in 2010 hahaha)

I've started doing paper craft ever since high school, but only dwelled into the beauty of paper quilling four years ago. I was browsing scrapbook.com, and came across some beautiful quilled flowers. I was immediately in awe, and later found out that it's called quilling. So I started digging more on the type of paper art, and had been in love ever since. I'm still no quilling expert, and my mentors are the Internet and quilling blogs, so it's a pretty much self-learned (I only have 1 quilling book to date!). But it's one thing I really enjoy doing, so I plan to continue doing it. Since it's no fun quilling alone, I'm always excited to spread the quilling love around, and am still trying very hard to encourage others to start quilling seriously.

I've received few queries about quilling tools in Malaysia, as it's not really a popular paper art among Malaysian crafters. I'm not really sure why it's not really popular - perhaps it's because of the hard to find materials, or the too-expensive quilling tools or simply because of the much needed patience and time to finish a quilled item. So here's another attempt of spreading the love around. Here are some questions that I always get, together with the answers I always give to interested quillers wannabes :P

Do you need special tools for quilling?
There are two types of quilling tools - one is the slotted type:


and another one is the needle type:


You can always google for further info and you can use either one of the tools. I started off quilling by rolling the papers using my fingers - you can do that if you want, but quilling tool will make you life easier, and will give you better quilling quality.

Where can I get quilling tools/ materials/ sets in Malaysia?
Since I've done my quilling research hehe, there are three places so far that I found selling quilling tools and quilling papers in Malaysia. Craft Haven @ One Utama, Scrapbook Memories @ One Utama and ArtFriend @ The Garden.

How much are they priced?
To date, Craft Haven is selling the slotted tool at RM10.90 each (they used to sell the needle type at RM15, but no longer having that stock now). Scrapbook Memories is selling branded Scrapbook Memories quilling tool set of 2 (both slotted and needle type) at RM45++ (can't remember much). ArtFriend is selling quilling set of 2 (different brand) but at RM19.90.

The papers are usually priced at RM15 - RM20 per packet, but I don't really care much about them, as I prepare my own quilling papers. If you're new to quilling, perhaps you would want to start by cutting your own strips first.

Quilled items are sold at the same craft shops at a range of RM7.50 - RM15.00 each, depending on the type of quilled items.

What types of papers can be used?
I'm still experimenting on the best papers to use - it truly depends on you. So far multi-coloured IKEA papers (can be found at Kid's Section and priced at RM20 per pack, but I found mine at As If section priced at RM10 per pack hehe) are the best type I found, but I also found construction papers (also known as sugar papers) to have some nice effects to quilling as well. I used A4 papers, and also buy those multi-colour A4 papers that come in set - usually priced at around RM4.00 - RM6.00 per pack. It's a bit thin though, and could be a bit difficult to shape, but I'm getting used to them.

In getting the quilling strips, at first I used to cut them (freehandedly coz I was too lazu haha) so they sometimes out uneven, but now I'm using paper shredder to shred my papers (i wrote about it here).

As for the tutorials on quilling, I have some in my tutorial section (promise to add some more later!) but you can check the quilling websites on the right side of this blog for some examples and other tutorials. There are also many free templates available online, and so many different ways to quill, but I believe the most important part of them all is not only the basics, but you need a WHOLE LOT OF PATIENCE and time to be dedicated to quilling.

Good luck and happy quilling!

Friday, January 30, 2009

Magnets, anyone?

Let's create something different today. If you are an avid reader of Anjung Seri, you'd probably recognize the Anjung Seri magnetic note where you can write important phone numbers or note etc and stick it on your fridge or on your magnetic board. We got lots of those when we bought Anjung Seri during the annual PWTC bookfair. Trust me, they'll still give it as freebie on this year's bookfair. They have too many of those. And the torn chicken recipe, was a freebie from a can/box that I couldn't remember.

The thing is, both of them had been on our fridge's door for few years now, and nobody seems to use them anyway. As much as we love fridge magnets, and collect them from places we've visited, I'm afraid these two didn't fit in well with the theme.

So I took them with me, and tore the sticker cover of that 'magnetic mat' (not sure what it's called hehe). And I paired them up with a few stickers that I bought at Amcorp Sunday Market few months back.


This is the easiest way to do your own fridge magnets of your own design. First you stick your favourite sticker on the magnetic mat like this:


They're not really my favourites, but I'm using them anyway hehe. Since the magnetic mat is so soft you can actually cut them according to the shapes you like. So I use my scissors and cut the shapes accordingly.


Until I got the desired shapes. Take your time cutting the magnetic mat because it can be a bit tricky at times, especially when you use small stickers. And here's the result:


Cute, aren't they? And here's what it looks like from the back.


Now it's ready to be decorated on your fridge, or better still, on your magnetic board in your study/craft room.


I don't have a magnetic board so I use the fridge for display purposes. :P


You can do this in less than 5 minutes, provided you have all the tools needed for the project. For now, I'm on experiment with the rest of the magnetic mat, trying to transform other everyday items into fridge magnets. Hehe. But that would have to wait.

Have fun experimenting too. :)

Friday, November 07, 2008

Tutorial - Paper Cake

I've finished all my classes by have been busy with RA work as well as my thesis proposal. Try to find time for crafting, and hopefully by the time I've submitter my proposal, I'll have time to do craft again. :)

Well, as promised, here's a tutorial on the "cake" as posted in the previous entry.

What you'll need:
2 manila cards (or any other better quality paper of the same size)
Double-sided tape
Scissors (or knife)
Box template

Cake Decorati0n:
Quilled roses (or any other type of flowers that that you prefer)


The box template can be found HERE - and this template is just perfect in size for 12 pieces of "cake". I've found a few other templates, but this is the best, and easiest one so far. What I did was, I printed out the template and traced the template on a cardboard. The cardboard template comes in handy what you want to design 12 templates for all the 12 pieces, and you can just recycle the cardboard template for your next cakes as well.

Once you have traced and cut the template, fold them so it will be like this:


And then you can decorate them all you want. As for me, I used things I love most - quilled roses hehe since my then theme was a "wedding cake". I've put the tutorial on how to make quilled roses before so that would come in handy.

First I rolled loose quilled peds and glued them on each of the cake piece:


Then I made the roses together with the swirls as glued them on around the cake - one rose on one piece of cake.


The centrepiece was the hardest one and you would require lots and lots of patience (if you don't have a steady hand like me heh!). First I cut out a scallop, then I started to paste the flowers as a bouquet. Make sure the glue for each flower dried first before continuing to glue others. Or else you could be VERY upset and stressed when the flowers did not turn out the way you want them to be.


I didn't paste the centrepiece in the midle of the cake, but just put them there. Don't glue the centrepiece, or else it would be difficult to distribute the cakes to your guests/ friends/yourself hehe.

And this would be your final result:


I actually found the idea at Mainly Flowers blog by Joanne - a truy WONDERFUL blog on many WONDERFUL ideas on paper flowers. She just posted a new flower-making tutorial, and I love that to pieces!

Try to make your own personalised cake, and don't forget to brag all about it yeah!

p/s thanks Sara for some of the pics.

Tuesday, September 23, 2008

How To : Quilled Butterfly

As promised, I finally managed to do the tutorial for quilled butterfly. Am so happy that my camera's back so now I can take lots and lots of pictures again! Yeay!

Okay here goes the how to session.


All you need would be scissors, glue, circle template (you can get this at any stationery shop), quilling tool (or toothpick) and strips of papers (including the triangle). If you're too lazy to find shredding machine or measure the lines (like me) -my advice: do it free-handedly hahahha.. it doesn't matter if you didn't get straight lines, as long as it looks nice, it's fine with me :P By the way, you won't need that many strips of papers. Just 8-9 strips will do.

Firstly, roll the triangle like you're doing a paper bead necklace (used to do this in art class in primary school) from the wide end to the smaller end. Glue it so it would look like this:


Then select you paper (for the butterfly wings). I've decided to used shades of orange and yellow. You would need 2 shades for the upper wings, and 2 shades for the lower wing. So, mathematically (though I'm not good at it):

2 different strips = attached together to become 1 multi-coloured strip.

so for the upper wings = 2 multi-coloured strips
and the lower wings = 2 multi-coloured strips

On size and lengths, basically I just make do with what I have. The slimmer triangle would mean slimmer butterfly body. As for the strips, I use A4 paper so that's the length for each coloured strip (so 1 multi-coloured strip = A4x2). You may want to use longer strips, as the result would be much better. I'm just... lazy.

God I'm really bad with maths.


Next, roll the strips using the quilling tool. Make sure you start rolling from the colour that you want to be the inside colour of the butterfly wings. In this case, the yellow is the inside colour and the orange is the outside colour.


... Until you reached peds like this:


Don't glue them yet! Instead, let them roll inside the circle template to get the intended size for the wings. In my case, I use a size 20 and 17 for my wings. It depends on how big you want your butterfly to be. (Mind the battered-looking template hehe)


Leave them for a while, then glue the end of the strips. Be careful and mantained the sizes.


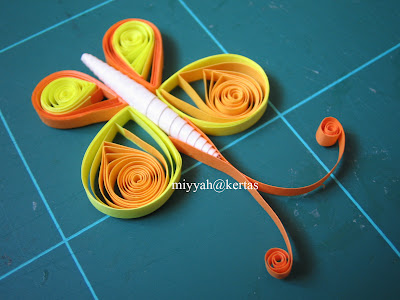
Repeat the steps until you have 4 rolled strips like this. Then you have to turn all four into the intended shape.


The shapes would be different depending on how you pinch the paper. This is a simple way of how to do the shape. Pinch the orange part first before pinching the yellow.


Then squeezzzee hard like this:


You can try different ways of pinching the quilled papers and have different results. But for the time being, here's what the quilled papers look like:


Once you have these, then you can start gluing them onto the butterfly body. Glue the smaller part first, like this:


Be careful as you would need glue that can easily dry and don't pull the butterfly before it's really dry. Once it's dry, then glue the upper parts. It's the same quilled paper, but I've adjusted the size so it could look rounder and fuller.


Attach the other part as well. Attaching the parts can be very tricky as the parts are really prone to detach themselves. So use whatever means necessary to stick them together. I usually use the quilling tool to help.


Once you're done attaching both parts, roll the two sesunguts to be attached to the butterfly.


And this will be your end result:


And you may want to make few friends for the butterfly... (I already have extras from the swap)


(oh! Yet to post the butterflies to our little miss Diva!)

LinkWithin

Related Posts with Thumbnails